 100% Satisfaction guarantee or money back
  Order by 2pm for next day delivery
  FREE shipping on order over £ 65
Log in or create new account to save this product to your wishlist.
Gardening tips, Plants,
How to Take Butterfly bush cuttings: a comprehensive step-by-step plan (with tips)
Butterfly bushes (aka buddlejas and lilacs) are gorgeous, abundant flowering plants that attract butterflies like a magnet. Find out how to grow your own bush from a cutting. SPOILER: It’s easy (and suitable for beginners!).
8 MIN
18 Aug
Last update:
17 Aug 2023
Latest articles
7 MIN 22 Jul How to keep your lawn in shape this summer 9 MIN 15 Jul Watering Your Garden: 10 Top Tips! 11 MIN 15 Jul Is Your Grass Type Right for your Garden? 11 MIN 10 Sep Create Your Low-Maintenance Garden – Tips and Ideas 11 MIN 08 Sep The Ultimate Guide to Choosing the Perfect Hedges for Your Garden 12 MIN 30 Aug The Top 20 Evergreen Climbers to Transform Your Garden
Having a hard time choosing?
Answer 2 questions about your lawn and we will help you choose the right product!
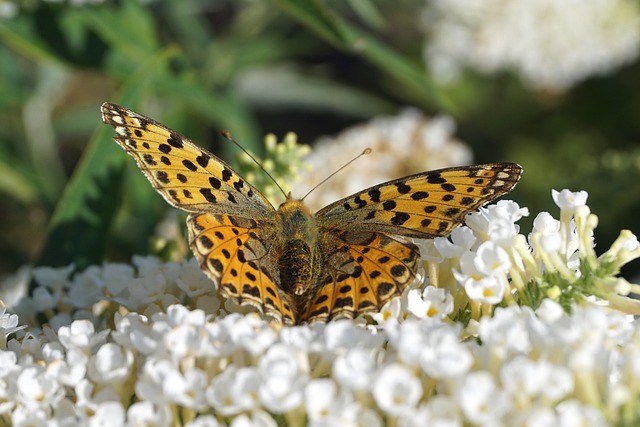
Few plants offer the enchanting effect on a garden as butterfly bushes — namely, Buddleja and Lilacs. And by taking and nurturing butterfly bush cuttings from another source, your garden instantly attracts stunning butterflies like a magnet.
Table of contents:
- Why you should have a butterfly bush
- What you need to take a cutting
- When can I take a butterfly bush cutting?
- Different cutting methods for butterfly bushes
- A step-by-step guide to propagating butterfly bushes from cuttings
- How to transplant your butterfly bush cutting
- Common mistakes to avoid
- Troubleshooting butterfly bush cuttings
- FAQ
However, while many butterfly bushes grow like weeds in the wild, they could fail in your garden if you provide the wrong conditions.
So:
This article explores how to develop a new bush from a butterfly bush cutting while explaining how to care for them once established for optimal results!
Ready? Let’s get started.
Why you should have a butterfly bush
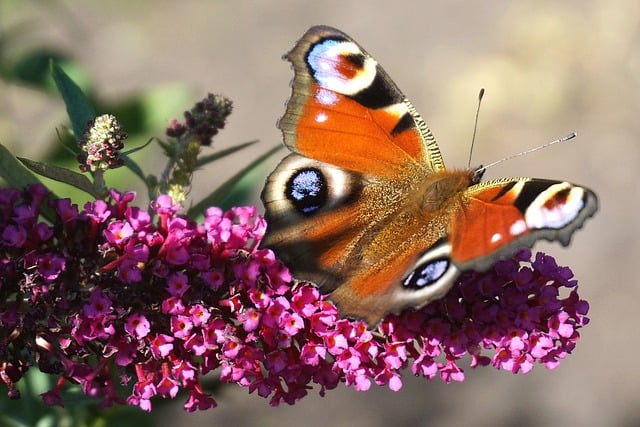
OK — “should” is a guilt word; we know that. But this is an exception. Because butterfly bushes help fill your garden with a stunning array of butterflies.
And who doesn’t want that?
Indeed, propagating butterfly bushes from cuttings offers many advantages:
- It’s cheap — you don’t need to go to the garden centre and spend money on new plants
- It doesn’t damage the mother plant
- It’s simple to do — so why not?
And what’s more, propagating new butterfly bushes from cuttings is accessible for even novice gardeners.
What you need to take a cutting

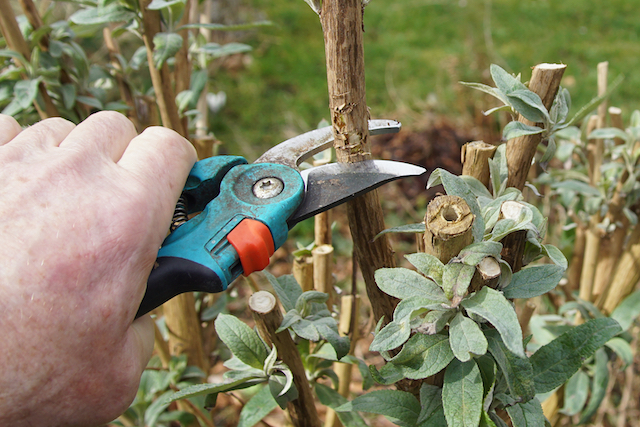
Before you start running around with shears like Leatherface from The Texas Chainsaw Massacre, it’s essential to have the necessary tools and materials on hand.
These are the essentials:
- Sharp tools — you’ll need either pruning shears or general garden shears. BUT, they need to be sharp to protect the plant. Blunt blades rip the branch, leaving a larger wound, which leaves the plant susceptible to infection and disease.
- Rooting powder – this contains growth hormones that help the cutting develop healthy roots more quickly.
- Good-quality potting compost — aim for the highest quality compost or vermiculite you can get your hands on.
- Pots or trays — you’ll need these for planting
- Plastic film or a propagator — this helps create a humid microclimate which promotes root growth.
- Water — you might choose to root the cuttings in water. Either way, you’ll need water to keep the cutting healthy.
When can I take a butterfly bush cutting?
The ideal time to take a cutting is in late spring or early summer when the mother plant is in its active growth phase. The cutting will have enough energy and nutrients to develop its own roots at this time.
Garden doctor Louis says:
Wait for the frost risk to pass before taking cuttings. Frost can cause damage and reduce the chance of the cutting developing roots.
Different cutting methods for butterfly bushes
You might think it’s a case of just cutting off a branch. But it’s a little more nuanced.
Choose your approach wisely:
Propagating a cutting in water
This is one of the most straightforward approaches, making it easier to see when roots begin to appear.
Placing your bush cutting in a glass or vase of water until it develops bottom roots, ensuring the bottom of the cutting is completely submerged.
Then, place the glass on a warm, bright windowsill — avoid direct sunlight.
Change the water every few days to keep it clean and oxygenated. Then, wait — it should typically root within a few weeks.
Once the roots are around 5cm long, the cutting is ready to transplant.
Propagating a cutting in the ground
This method is more traditional, requiring a little more care and attention, but it’s often very successful.
This method involves planting the cutting directly into the ground or potting compost and allowing it to take root in the soil.
The main problem with this approach is that you can’t see the roots, so you’re never entirely sure whether the cutting has taken. Of course, it will begin to grow — that will be all the confirmation you need!
A step-by-step guide to propagating butterfly bushes from cuttings
Now you’re familiar with the basics, let’s go over the best approach to nurturing your cutting into a healthy plant.
Step 1: Choose a healthy mother plant
A cutting is only as healthy as the plant it comes from, so select a healthy, mature butterfly bush from which to take your cuttings.
Check that the mother plant is free from diseases, pests, and signs of ill health (such as yellowing leaves, poor flowering, etc).
Step 2: Take the cutting
Take a cutting of around 10-15cm in length. Use clean cutting tools to prevent damage to the plant.
Take a cutting from the top of the plant, preferably a shoot that doesn’t have a flower at the end.
Remove the lower leaves so that the bottom half of the cutting is just stem.
Step 3: Cover the tip of the cutting with rooting powder
This will help stimulate root growth. However, the cutting should still take if you don’t have rooting powder; it may just take a little longer to develop roots.
Step 4: Plant the cutting
Place the stem of the cutting into a compost-filled pot or tray. Make sure the soil is (and remains) moist — but you don’t want it too wet.
Always choose a pot or tray with draining holes.
Step 5: Maintain humidity
Humidity will help roots develop more quickly, so cover your pot or tray with plastic wrap or use a propagator lid to create a humid environment.
And mist the plant with water when it looks like the soil is drying. Place the pot in bright, indirect sunlight.
Step 6: Wait!
Your cutting will take root within 3-6 weeks. To test if the cutting has developed roots, lightly tug on the stem — if there’s resistance, you’ll know the cutting has rooted.
How to transplant your butterfly bush cutting

Once your cutting has developed roots, it’s time to plant it in its permanent new home.
- Choose a sunny location in well-drained soil.
- Dig a hole – make it larger than the root ball. Then, place the cutting into the hole and carefully fill it with good-quality, well-draining compost. Firm the soil around the cutting.
- Water generously, saturating the soil to help settle the roots.
- Maintain the cutting as it grows. Ensure it gets plenty of water and remove weeds to avoid nutrient competition.
Common mistakes to avoid
While this is a simple process, some common mistakes inhibit success:
- Taking cuttings from unhealthy mother plants — this will never produce satisfying results.
- Using blunt blades to make the cutting. This damages the plant. A clean cut will help the cutting take root.
- Insufficient watering — don’t cut and replant, then leave. Ensure your cutting gets enough water, especially in the first couple of weeks of rooting.
- Too much sunlight — while your cutting needs bright sunlight, too much direct sun will dry out the cutting.
- Impatience — the process takes time. All good things are worth waiting for!
Troubleshooting butterfly bush cuttings
You might run into some problems. Here are approaches to tackling them:
- Lack of root growth — check that the plant is getting enough moisture and humidity. Adjust your strategy if the soil is drying out.
- Flabby cuttings — if the cutting becomes flaccid and limp, it could be a sign of overwatering. Allow the soil to dry out a little before watering again.
- Mould — if you notice mould on or around the cuttings, there’s too much humidity. Add some air holes to improve air circulation.
FAQ
How do I grow a large butterfly bush?
Your butterfly bush needs plenty of space to grow. Remember, these plants grow very big, so choose a sunny location with good, well-draining soil when planting, allowing plenty of room above and around the plant to spread. Water regularly and fertilise in the spring. Prune each year to improve flowering and foliage growth.
How do you take a cutting from a butterfly bush?
Cut soft shoots of 10-15cm in length in the spring. Choose flowerless shoots from the top of the mother plant. Remove the lower leaves, dip the stem in rooting powder, and plant in potting soil. Keep the soil moist and protect it from direct sunlight until it takes root.
How do you promote growth in a butterfly bush?
If you want to develop height and width of your existing butterfly bush, cut it back by a third. Remove weak shoots and faded flowers, and feed the plant immediately after pruning. The following year, it will grow substantially.
Any questions?
I hope I’ve provided all your questions about growing buddleias and lilacs from cuttings. But if you have any questions, don’t hesitate to get in touch.
Or check out our super-comprehensive Help & Advice section.
Thanks for reading.
SURVEY

Find the best match for your needs in no time!
Answer 2 questions and we provide you with the best product.
What lawn size do I have?
Leave a comment
Your answer will be displayed on the site and the interested party will be notified by email.
Leave a comment
Have a question or want to share your experience? Leave us a comment.
Read more
The best tips and tricks for a lush green lawn
 7 MIN
13 Sep
Lavender Cuttings: a step-by-step guide
7 MIN
13 Sep
Lavender Cuttings: a step-by-step guide
 11 MIN
10 Sep
Create Your Low-Maintenance Garden – Tips and Ideas
11 MIN
10 Sep
Create Your Low-Maintenance Garden – Tips and Ideas

 Scarifying Kit
All products after scarifying | Quickly restores the lawn after scarifying | Outsmart weeds quickly with the use of this kit
From: € 39.99
Scarifying Kit
All products after scarifying | Quickly restores the lawn after scarifying | Outsmart weeds quickly with the use of this kit
From: € 39.99
 Spring Lawn Care Kit
MOOWY’s choice for the spring | Quick recovery of your lawn after winter | A strong lawn prevents weeds
From: € 25.99
Spring Lawn Care Kit
MOOWY’s choice for the spring | Quick recovery of your lawn after winter | A strong lawn prevents weeds
From: € 25.99
Top
Top
 Long Lasting Lawn Fertiliser
Effective for 90 days | See results in 14 days! | Suitable for all types of grass and soil
From: € 13.99
Long Lasting Lawn Fertiliser
Effective for 90 days | See results in 14 days! | Suitable for all types of grass and soil
From: € 13.99
Long Lasting Lawn Fertiliser
Effective for 90 days | See results in 14 days! | Suitable for all types of grass and soil
From: € 13.99
Free download
Do you want a lawn calendar?
🌱 All important maintenance moments for your lawn during the year. Leave your email and we will send you the lawn calendar for free.
Enter your email
Receive the lawn calendar in the mail
Enjoy a green lawn all year round!


Comments (0)
There are no comments yet. Well then, what are you waiting for to
Be the first to write your comment!inaugurate this pretty page?
Do you have some comments?